Epoxy flooring has gained massive popularity both at home and on commercial premises. You may need to cover your garage with a sleek polish or seal your basement floor. Epoxy is hardy, appealing and easy to maintain. However, what do you do to a professional epoxy floor coating? To achieve a fantastic epoxy floor that will last several years, it is necessary to take the correct steps and apply the appropriate tools.
In this guide, we will take you through the steps on the use of epoxy floor coating, including preparation, all the way to the top of the last layer. We will give you tips and tricks that will show you how to get a smooth and professional-looking floor, regardless of your level of experience.
Why Use Epoxy Floor Coating?
Epoxy floor coating is a high-durability and economical coating that can be applied to a large number of applications. Epoxy has a number of advantages that have made it a favorite among people, whether you are covering a garage floor, a basement or even a commercial place. We will start by examining the reasons why you should consider using epoxy on your floor:
1. Durability and Protection
Epoxy has been known to be tough. After the cure, epoxy creates a hard and durable layer that does not break because spills, stains, and scratches are resistant to epoxy. It has a high-traffic area, which is ideal as it can be used in garages and basements where flooring is highly utilized. Moreover, epoxy is used to shield the concrete that is underneath, against moisture, oils and chemicals, which will wear and tear as time progresses.
2. Aesthetic Appeal
Epoxy finishes are available in an enormous range of colors, finishes, and textures. Epoxy provides a limitless range of design options, whether a high-gloss finish is required or a more textured, matte appearance is needed. It not only improves the look of your floor but also makes the room brighter due to its reflective surface, especially when a room is applied in a well-lit room.
3. Easy Maintenance
Epoxy floors are not hard to wash. The smooth surface does not allow an accumulation of dirt and dust on the floor and any spill can also be wiped up easily without leaving behind any form of stains. This is most particularly needed in places such as garages and kitchen areas, where grease and oil and other substances could be spilled on the floor.
What Is Epoxy Flooring and How Do You Apply It?
Epoxy flooring is a coating that is composed of resin and hardener. They are powerful and resilient when combined, creating a surface that sticks to the concrete below. This is the step-by-step analysis of the way to implement epoxy floor coating like a professional:
1. Prepare the Surface
Surface preparation is the most important in ensuring that an epoxy floor lasts long and is smooth. The epoxy will not stick together without proper preparation and may peel or bubble in the long run. To prepare a good surface, do the following:
- Clean the Floor: It is advisable to clean up the concrete floor first. Clean any dirt, dust, grease, etc. Clean up is done using a broom or shop vacuum and then a degreaser or concrete cleaner is used to clean the floor. This is taken to make sure that the epoxy has a clean surface to stick to.
- Repair Cracks and Holes: In case your floor has had a crack or any holes, you will need to fill in the holes after which you will apply the epoxy. When filling these imperfections, use a concrete patching compound. After the patches have dried, sand the floor even to ensure that the floor is smooth.
- Etch the Concrete: Concrete surfaces are usually too smooth for the epoxy to bond at all. You will have to etch the concrete in order to enhance adhesion. An acid etching solution can be used, or an epoxy kit can include its own etching product. Etching products can be used; however, it is important to follow the advice of the manufacturer in order not to harm the floor.
2. Choose the Right Epoxy Kit
In this case of putting epoxy on your floor, it is important to select the type of epoxy. There are various applications of epoxy kits and therefore one should be sure to get the best suited which fits that specific project.
- Flooring Kits: When it comes to a garage or basement floor, a high-performance flooring kit will be selected to be used on heavy-duty use. Such kits normally include the resin and hardener, and other required materials, like decorative flakes or non-slip additives.
- Color and Finish: EPOs are available in a range of colors and finishes such as glossy, satin and matte. You can also get decorative chips in order to make a personal appearance. In the majority of residential settings, the high-gloss finish is common since it is light-reflecting and makes the living place look brighter.
3. Mix and Apply the Epoxy
The next step is to prepare and apply the surface and the coating when you have the proper epoxy kit. Then use the epoxy in the following manner:
- Mix the Epoxy: Epoxy is a two-part system: the hardener and the resin. These two components should be mixed well, depending on how the manufacturer intends them to be mixed. Also, make sure to observe the suggested ratio of mixing, as it may lead to a weak bond and failure to cure properly.
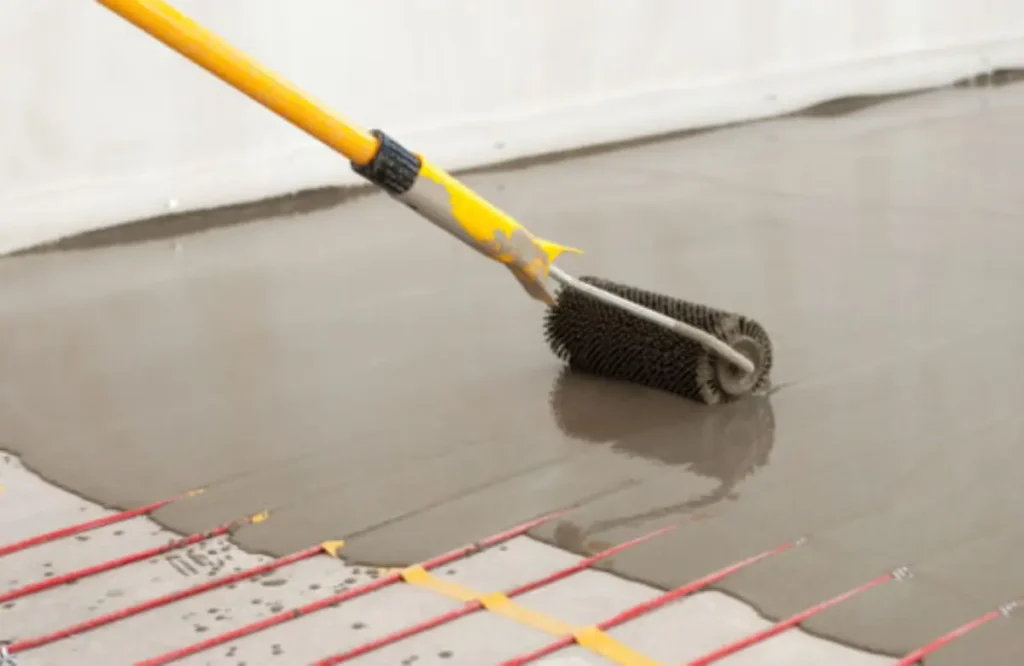
- Apply the Epoxy: Coat the epoxy on the floor with a roller or paintbrush. Begin on one end and work outward to make sure that you do not paint yourself into a corner. Put a layer of epoxy on, which should be thin and even, and do not leave any puddles or thick spots. The epoxy should be spread evenly on a large surface using a roller and the edges or corners that cannot be easily reached should be done using a paintbrush.
- Add Decorative Chips (Optional): Epoxy kits include decorative chips that can be sprinkled over the new epoxy that has just been applied. Such chips provide the floor with texture and color to make it look more personalized. In case you wish to add chips, add them when the epoxy is wet.
- Allow to Dry: When you have applied the first coat, you should leave it to dry within the period that is recommended (normally 12-24 hours). Ensure that the room is well ventilated to accelerate drying. Once the first layer is dry, apply a second layer should it is necessary to add additional protection and to have a more uniform finish.
4. Apply a Topcoat (Optional)
In case you desire to increase the level of protection and, at the same time, improve the looks of your epoxy floor, it is recommended that you use a topcoat. The topcoat is used to seal the epoxy and provides an additional shine and strength. It also eases the cleaning of the floor and stains are avoided.
5. Cure and Enjoy
After coating it up to the final time, allow the floor time to cure before stepping on it. The epoxy floors normally require 3-7 days to cure, depending on the temperature and humidity of the room. Watch patience and never rush too much during this time; you may end up spoiling the coating before it is completely hardened.
Tips for a Successful Epoxy Floor Installation
- Temperature and Humidity: Epoxy is most effective when it is used in temperatures of 50°F to 90°F (10°C to 32°C). The curing process can also be affected by high humidity levels and thus, it is best to have a day with low humidity.
- Work in Sections: When you are applying epoxy to a big area, work in small sections. This will aid in making sure that the epoxy is applied evenly and does not begin to dry before you are done applying it.
- Use the Right Tools: It is worth investing in a roller and a brush of good quality to get a smooth, even cover. A roller that is long-handled is best for large areas.
- Be Patient: Wait till one coat is dry before applying another one. When it is rushed, it may lead to an uneven finish.
Benefits of Epoxy Flooring
Epoxy flooring is associated with numerous benefits, particularly when done appropriately. The following are some of the advantages of epoxy floors:
- Durability: Epoxy provides a hard and strong surface which is capable of withstanding high foot traffic, vehicles and spills.
- Aesthetic Appeal: The sleek finish adds the beauty of appearance in any room, making it look more contemporary and sophisticated.
- Low Maintenance: Eposite floors are simple to clean and maintain, and a simple sweep or mop is all required to make them look good.
- Resistance to Chemicals and Stains: Epoxy flooring is not affected by stains, oil, grease, and chemicals, hence it is ideal in garages, kitchens and any other place with heavy traffic.
Conclusion
With the application of the epoxy floor coating, you can change the appearance of your floors and make them more attractive, durable and easy to maintain. With the right steps, the best products and patience, you will get a professional-like finish that lasts through the years. Epoxy is a clever solution to improving your garage or keeping your basement floor safe, whether you are renovating your garage or keeping your basement dry.
To explore more tips and high-quality products for your next flooring project, visit Knapp Painting today.
FAQs
The time it takes epoxy floors to fully cure depends on the weather and humidity in your area and average it is 3-7 days.
Yes, one can indeed apply epoxy to old concrete floors yet they are to be cleaned, repaired and well prepared so that they may adhere well.
Just need to sweep or vacuum the floor and then mop occasionally using a small amount of detergent. Also not to use rough chemicals that will harm the coating.
Topcoat is not compulsory, but advised to add protective and shiny properties. It also simplifies the cleaning of the floor.
When maintained and taken care of, epoxy floor coating can last as long as 10-15 years, depending on the level of traffic and wear that the coating will be subjected.